
KB User's Guide - Users Tab - User Access Groups
- Overview
- Creating a new User Access Group
- Editing an existing User Access Group
- Applying User Access Groups
- See Also
Overview
KB group administrators can create custom subgroups of users, called User Access Groups, to provide more granular control over access to documents owned by the group.
User Access Groups are most commonly linked to individual documents to restrict Read and/or Write Access to members of the group. Members of these groups can view or edit documents that non‑members cannot.
User Access Groups can also be associated with a topic, granting members the ability to publish documents within that topic even if they do not have full publish permissions on their account.
Tip
You can also create the dynamic equivalent of a User Access Group by creating a "doc-level" Group Authorization rule. This will populate a group based on user attributes, such as the campus unit they work for.
Creating a new User Access Group
-
In the KB Admin Tools, navigate to the Users tab.
-
Click on the User Access Groups link on the left navigation bar.
-
In the Add a user access group table, enter a User Group Name and User Group Description (optional), then click the Add button.
-
Find your new User Access Group and click the Members button.
-
Select the "Member" check box for the users you would like added to the group. Once you have selected everyone who should be a member of the group, click Update.
Editing an existing User Access Group
-
To change a group name:
- Enter a new Group name in the Group Name field.
- Click the Update button at the bottom of the page.
-
To change a group's description:
- Enter the new description in the Group Description field.
- Click the Update button at the bottom of the page.
-
To add or remove members:
- Click the Members button for the appropriate Group.
- Check or uncheck a box to add or remove a member.
- Click the Update button to save changes.
- If refreshing, you may click Select All or Deselect All to make it easier to clear the list.
-
To deactivate or activate a group:
- Toggle the Active checkbox as checked or unchecked depending on whether you are activating the group (checked) or deactivating the group (unchecked).
- Click the Update button at the bottom of the page.
-
To delete a group:
- Click the Delete button to the right of the group.
- Confirm your choice in the dialog window. Please note that deleting the group will remove any document restrictions the group had previously been controlling.
Applying User Access Groups
User Access Groups can be associated with documents to restrict write and read access, or to topics to grant conditional publish rights.
Restricting write access
Your active User Access Groups appear in the Write access section of the document edit screen, typically collapsed under the Show all write access toggle. Selecting one or more groups limits who can edit the document, though the exact set of authorized editors also depends on the standard write‑access option chosen for the document.
If Owner or Owner group admins is selected, checking a User Access Group adds those members as additional editors. If Owner group is selected, checking a User Access Group narrows editing permissions to only the members of that group (along with the owner, who always retains write access).
In the example shown below, both Owner group admins and the members of the KB Team User Access Group have permission to edit the document. This means all group admins, as well as all members of the KB Team, are authorized editors.

Note: Other groups populated from Group Authorization rules may also appear in the write access section. See KB User's Guide - Users Tab - Group Authorization for more information. You can hover your mouse over a group to see a tooltip that will either display a list of members (if it is a User Access Group) or the criteria for the rule (if it is from a Group Authorization rule).
Authors who do not have write access to a document will see the following, depending on whether they have the publish rights in your group space:
-
If they do not have publish rights, they will be unable to access the edit screen for that document. The "Edit" button for the document will appear to be disabled, and attempting to access the edit screen directly will result in an error message.
-
If they do have publish rights, they will be able to access the edit screen, but all of the text fields will be grayed out. They will still be able to edit most of the settings below the document, such as topics and site access. They will not be able to save changes to the write access setting, i.e. they cannot grant themselves access this way.
Restricting read access
Your active User Access Groups appear in the Read access section of the document edit screen, typically collapsed under the Show all read access toggle. Selecting one or more groups limits who can view the document in both the KB Admin Tools and your internal site. The document owner always retains read access.
Authors who do not have read access will see different behavior depending on whether they have publish rights in your group space:
-
Authors without publish rights — They cannot view the document or access its edit screen. The document title will not appear as a link, and the Edit button will appear disabled. Attempts to access the document or its edit screen directly will result in an error message.
-
Authors with publish rights — They can open the edit screen, but all text fields will be grayed out and replaced with a notice indicating they do not have read access. They can still modify most settings below the document, such as topics and site access. However, they cannot change the read‑access setting and therefore cannot grant themselves access.
Note: Additional groups may appear in this section if they are populated through Group Authorization rules. Hovering over a group displays a tooltip showing either the list of members (for User Access Groups) or the rule criteria (for authorization‑based groups).
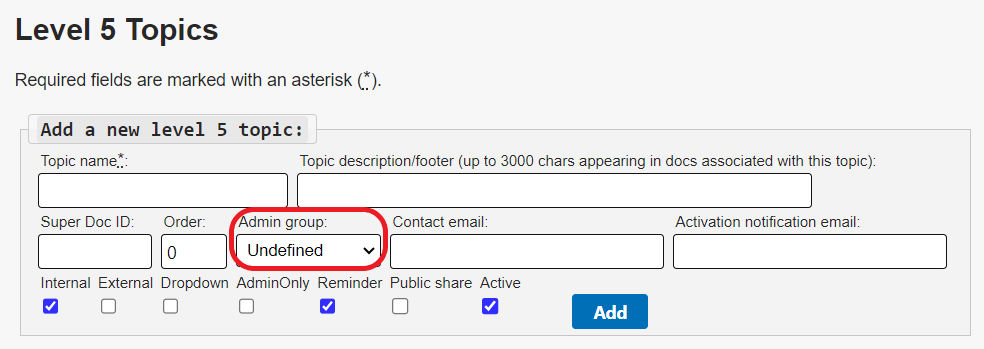
Granting publish rights based on topics
You can associate a User Access Group with a topic in your topics tree with the Admin group topic setting. For more information about topics, please see KB User's Guide - Topics Tab - Adding, Editing, and Deleting Topics.
When any member of the selected User Access Group edits a document with that topic assigned to it, they will have the ability to publish the document, even if their user account does not have the "Publish" permission checked.
This is useful for cases where you want to allow an author to publish documents that are specifically related to their area of expertise.